
How to Fix ThrottleStop Not Working [Causes & Fixes]
Is your CPU still hitting thermal limits even after you applied an undervolt, or does ThrottleStop look like it’s working while your temperatures and clock speeds tell a different story under load? See our complete guide on how to fix ThrottleStop not working for that exact situation.
We’ll explain why undervolting fails on many Intel laptops, how BIOS locks, Windows 11 security features, and firmware updates block voltage control, and what adjustments still make sense when FIVR access is restricted.
Undervolting matters only when it is done correctly, because clean, controlled tuning reduces heat, stabilizes performance, and prevents crashes, throttling, and lost settings after reboot. Let’s start!
ThrottleStop Not Working on Windows 11
Windows 11 introduces several built-in security features that “quietly” limit how programs can interact with your processor. ThrottleStop needs deep access to CPU voltage registers, and those access points are often closed by default in Windows 11. This is why undervolting, or FIVR adjustments, can suddenly stop working after a clean install or a major Windows update.
Causes:
- Windows 11 has Virtualization-Based Security (VBS), which prevents ThrottleStop from accessing CPU voltage registers.
- The Core Isolation Memory Integrity feature can block unsigned driver actions.
- There could be BIOS-level virtualization locks, such as Intel VT-x or VT-d, enabled in the BIOS.
- Corrupted ThrottleStop.ini or outdated versions of ThrottleStop.
Fixes:
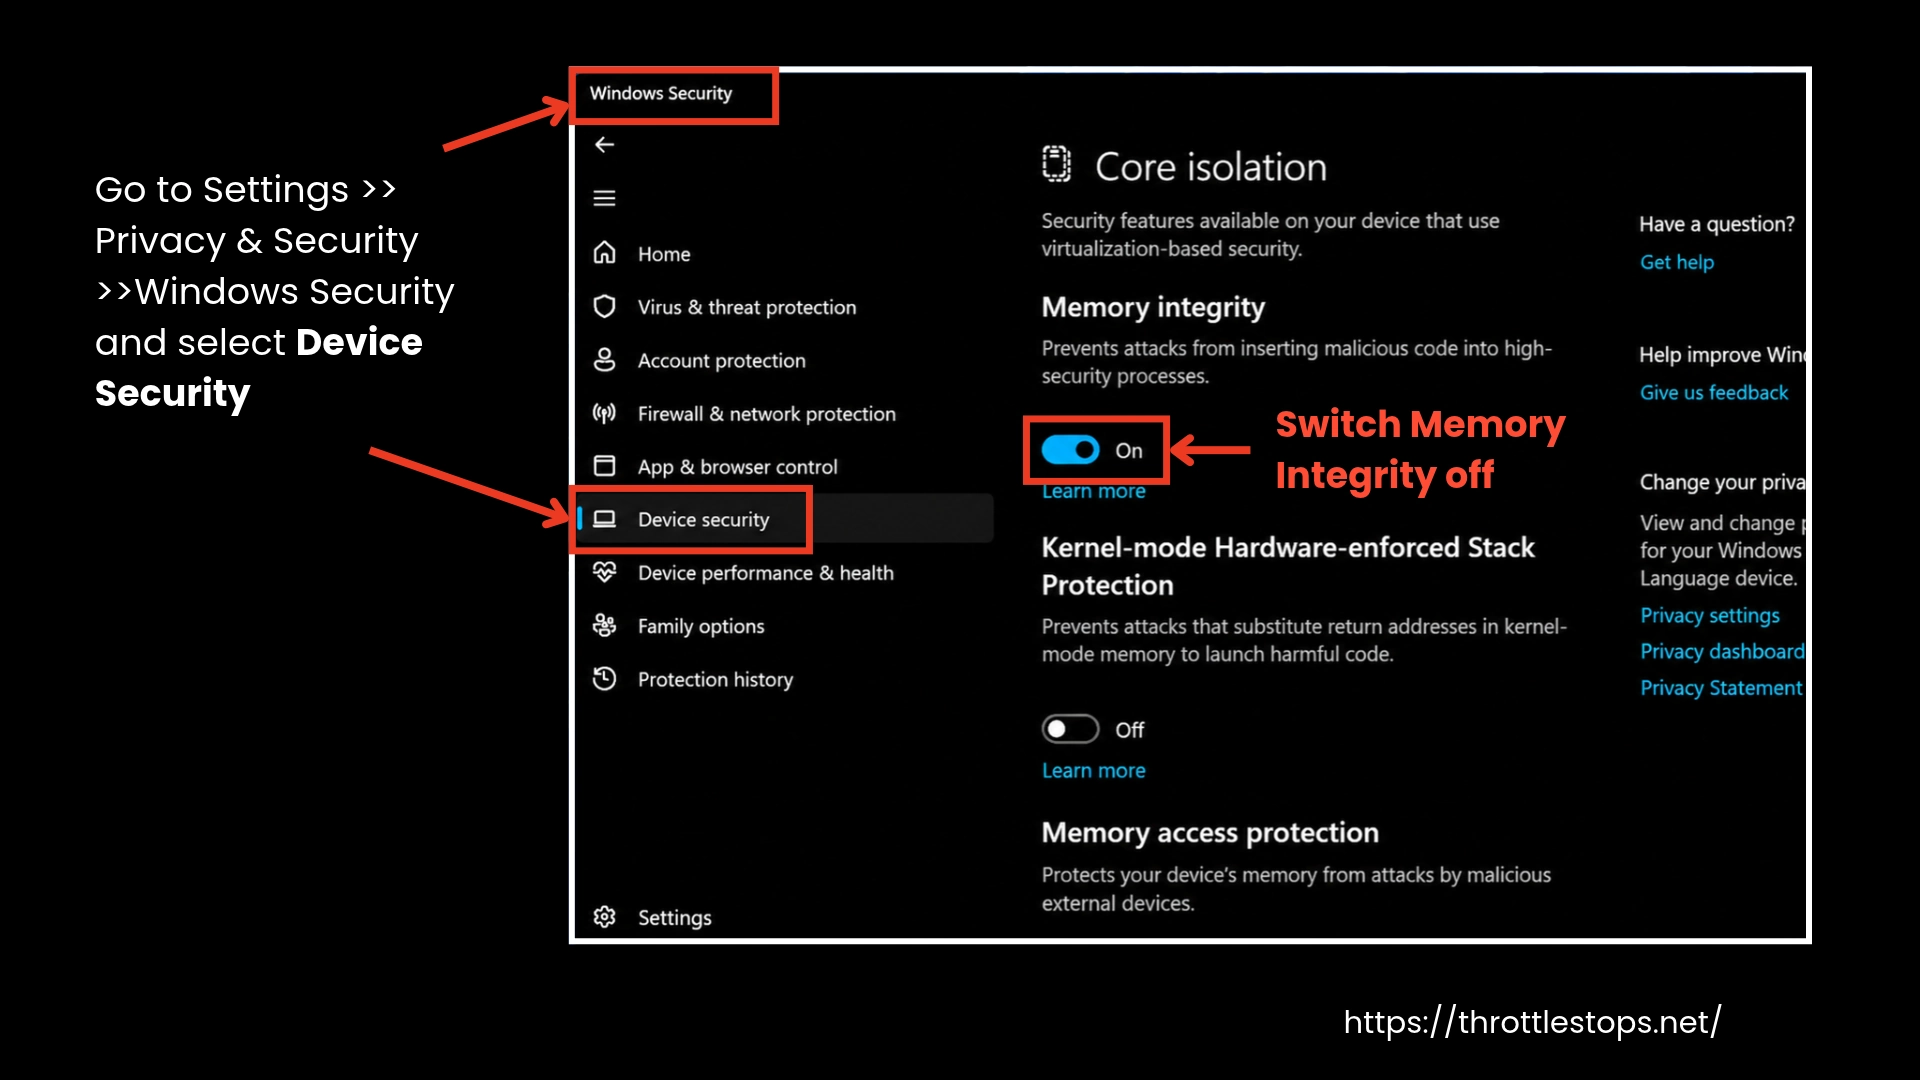
- Disable Memory Integrity: Simply open Windows Security. Go to “Device Security” and select “Core Isolation.” Here, turn off “Memory Integrity” and restart the laptop.
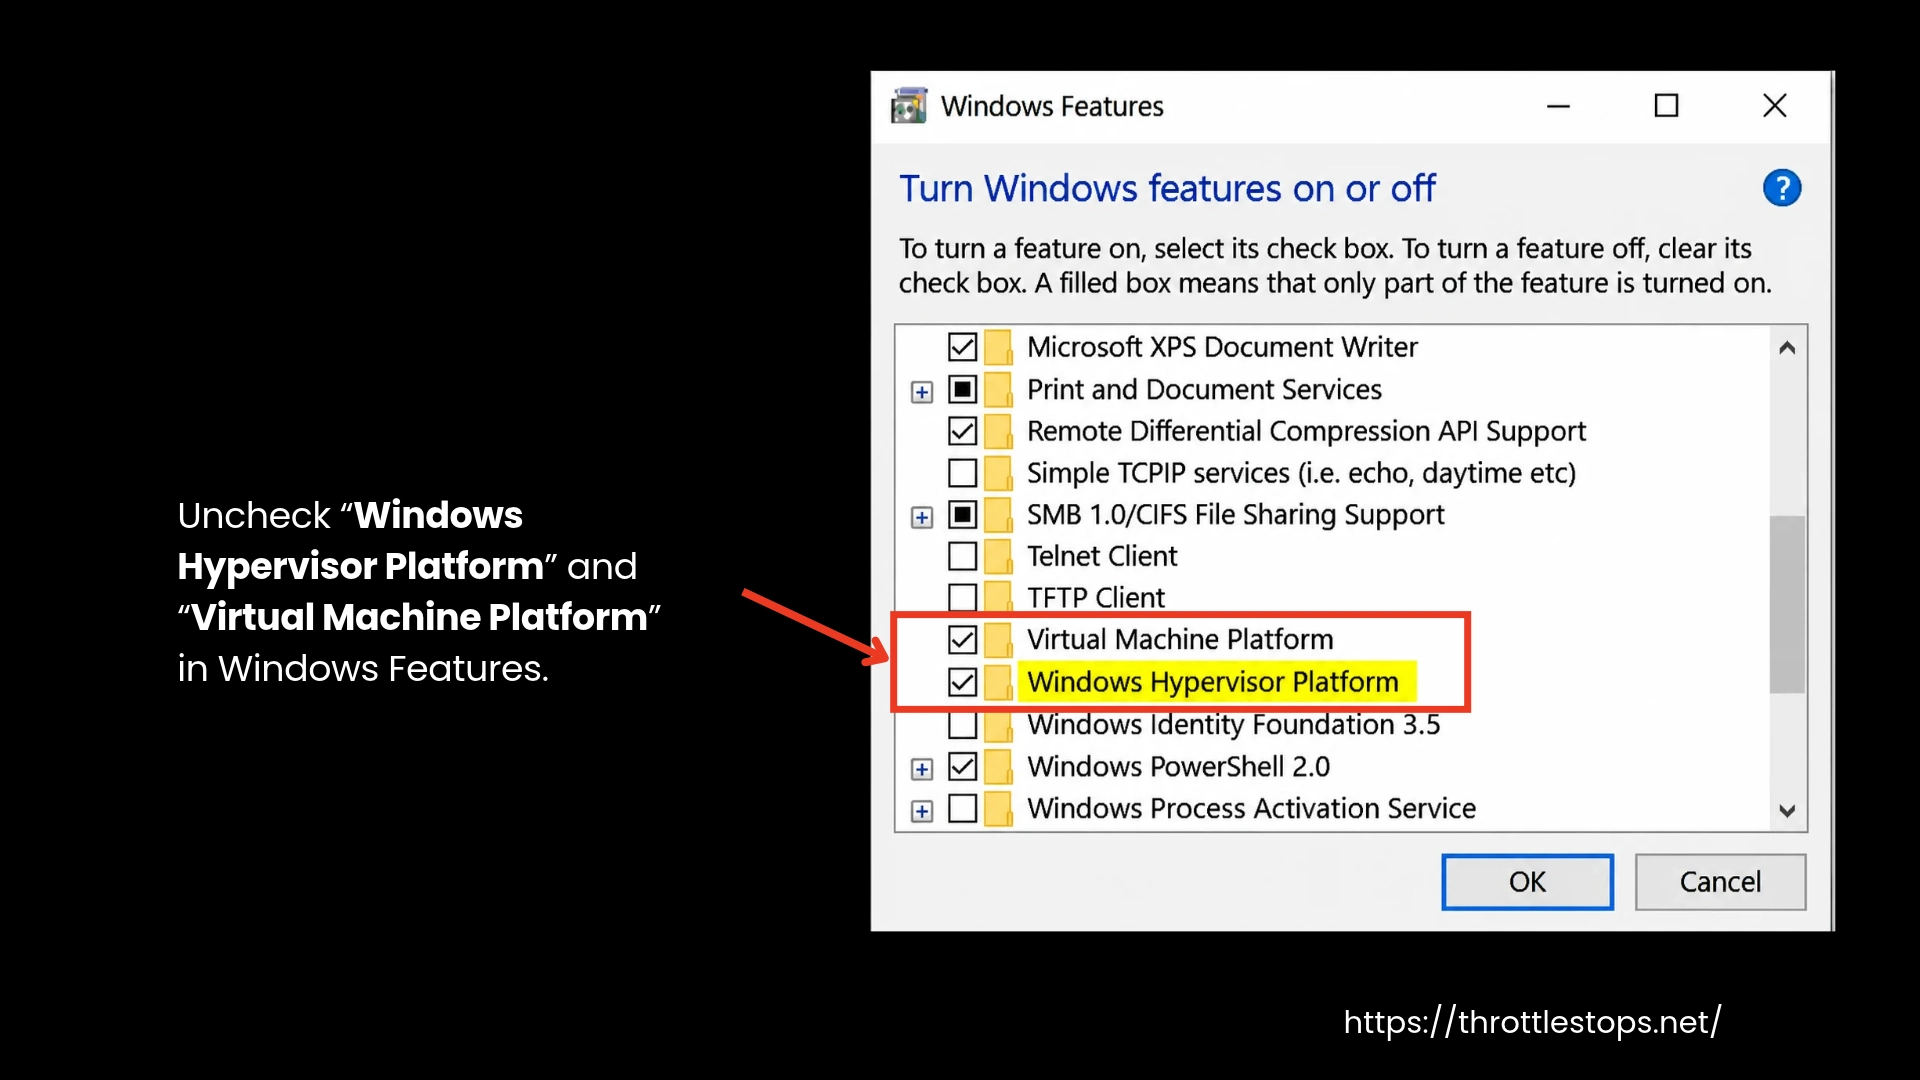
- Disable Windows virtualization: Uncheck “Windows Hypervisor Platform” and “Virtual Machine Platform” in Windows Features.
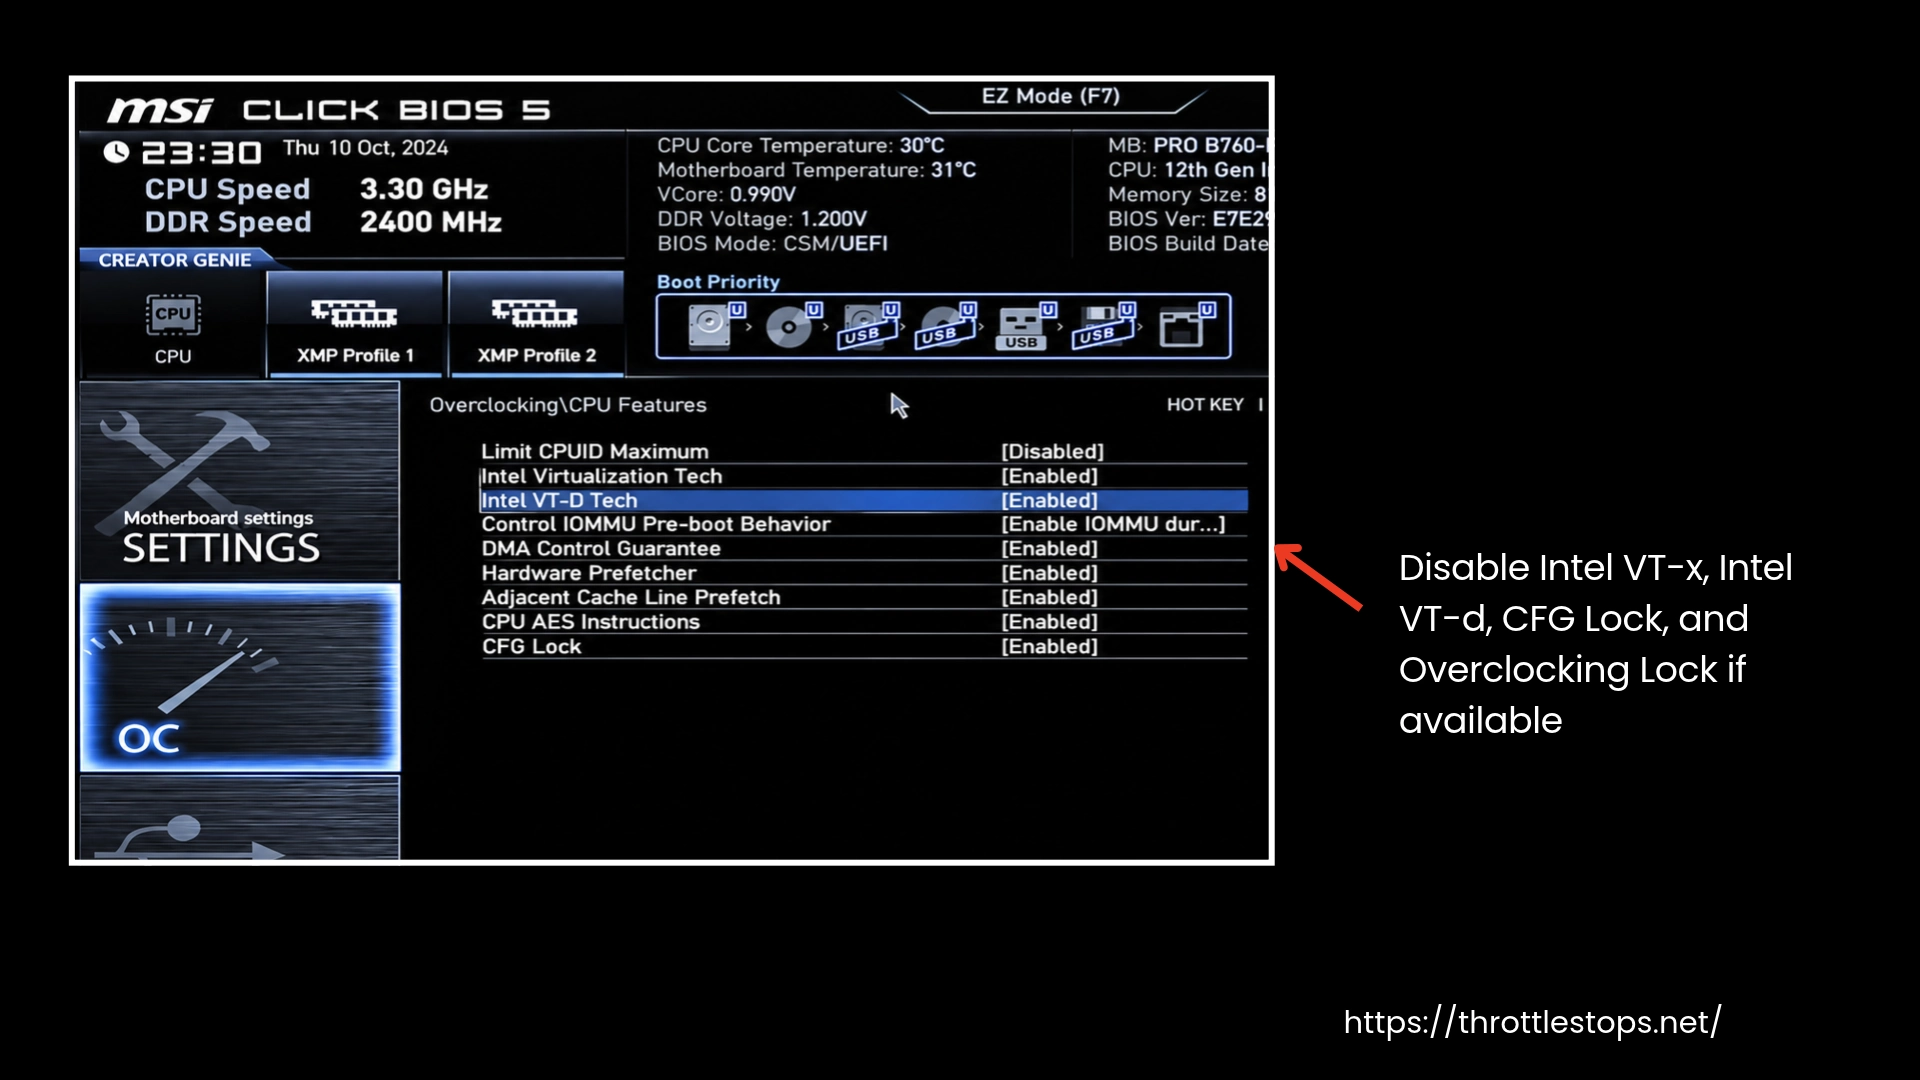
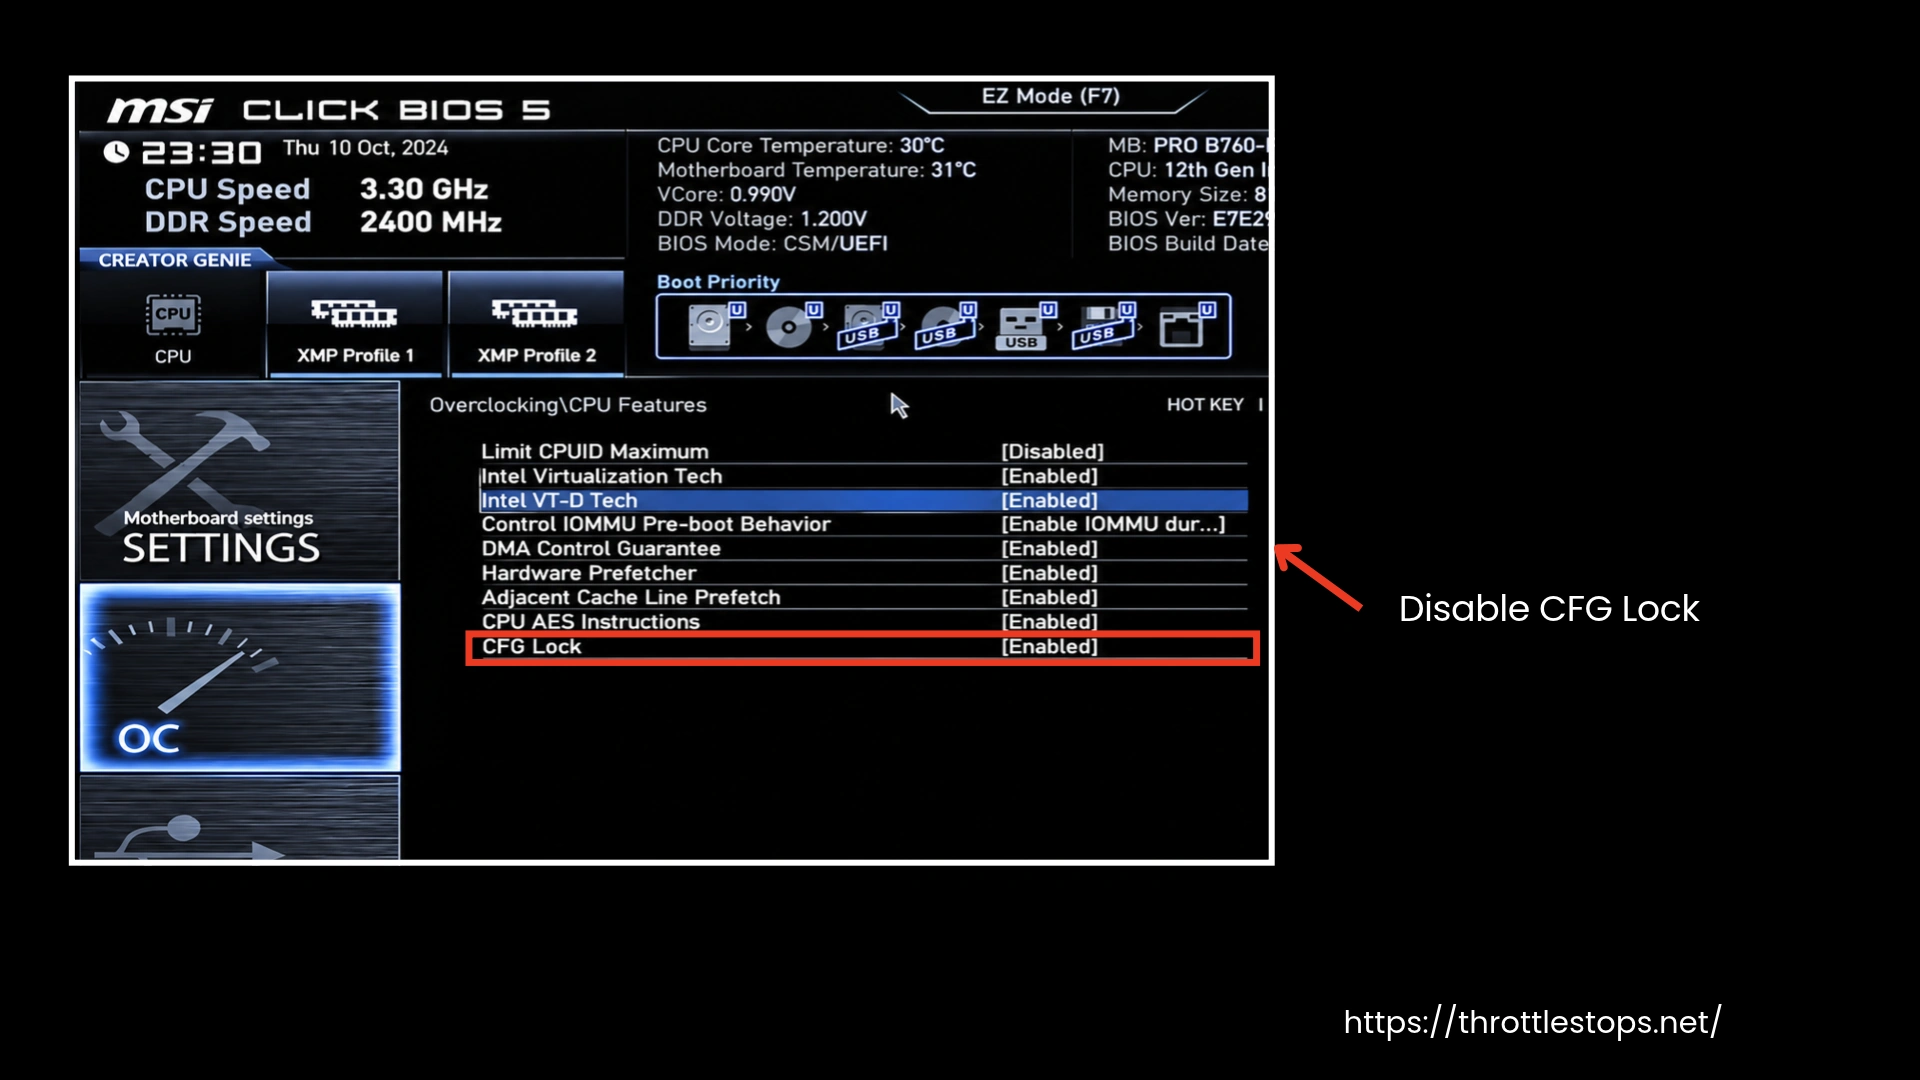
- BIOS adjustments: Enter BIOS (F2/Del) and disable Intel VT-x, Intel VT-d, CFG Lock, and Overclocking Lock if available. If these options are not available, you may not be able to use ThrottleStop's voltage controls or certain underclocking/overclocking features.
- Reset ThrottleStop: Delete ThrottleStop.ini, download the latest version from the official source, and run it.
- Run ThrottleStop again: Open ThrottleStop and check if the voltage controls and FIVR settings now respond properly.
These steps fix the issue for most Windows 11 users. If the problem continues even after turning off Memory Integrity and applying BIOS changes, the cause might not be Windows itself. The issue could be elsewhere, such as ThrottleStop not applying your undervolt, a locked FIVR window, or FIVR showing as unavailable on your CPU.
ThrottleStop Not Running
If ThrottleStop is not lowering temperatures, managing CPU throttling, opening correctly, or options like “Unlock Adjustable Voltage” are greyed out, do not panic; the issue may be fixable. These are common ThrottleStop problems, and in many cases, they are caused by laptop BIOS settings, Intel microcode updates, or CPU firmware restrictions that block undervolting and power controls. This means ThrottleStop can still detect your CPU, but your laptop may prevent it from changing voltage or power settings. Here’s why ThrottleStop is not running or working and what you can do.
Causes:
- Intel permanently removed voltage and turbo ratio control on 11th Gen U and G series CPUs after the Plundervolt vulnerability.
- Some 10th Gen and older CPUs received Intel microcode updates that lock undervolting.
- OEMs like Dell, Lenovo, and HP often enable CFG Lock or Overclocking Lock at the firmware level.
- BIOS updates can silently re-lock settings that previously worked.
How to Fix or Verify:
- Check the CPU generation first. 11th Gen U or G means undervolting isn’t always possible. It’s possible on specific 10th Generation and older Intel CPUs, as well as newer unlocked K, HK, and HX series processors. If you have one of these CPUs, move on to the next step.
- Restart the laptop and enter BIOS (press F2, Delete, F10, or F12 during startup).
- Open Advanced, Performance, or Overclocking menus.
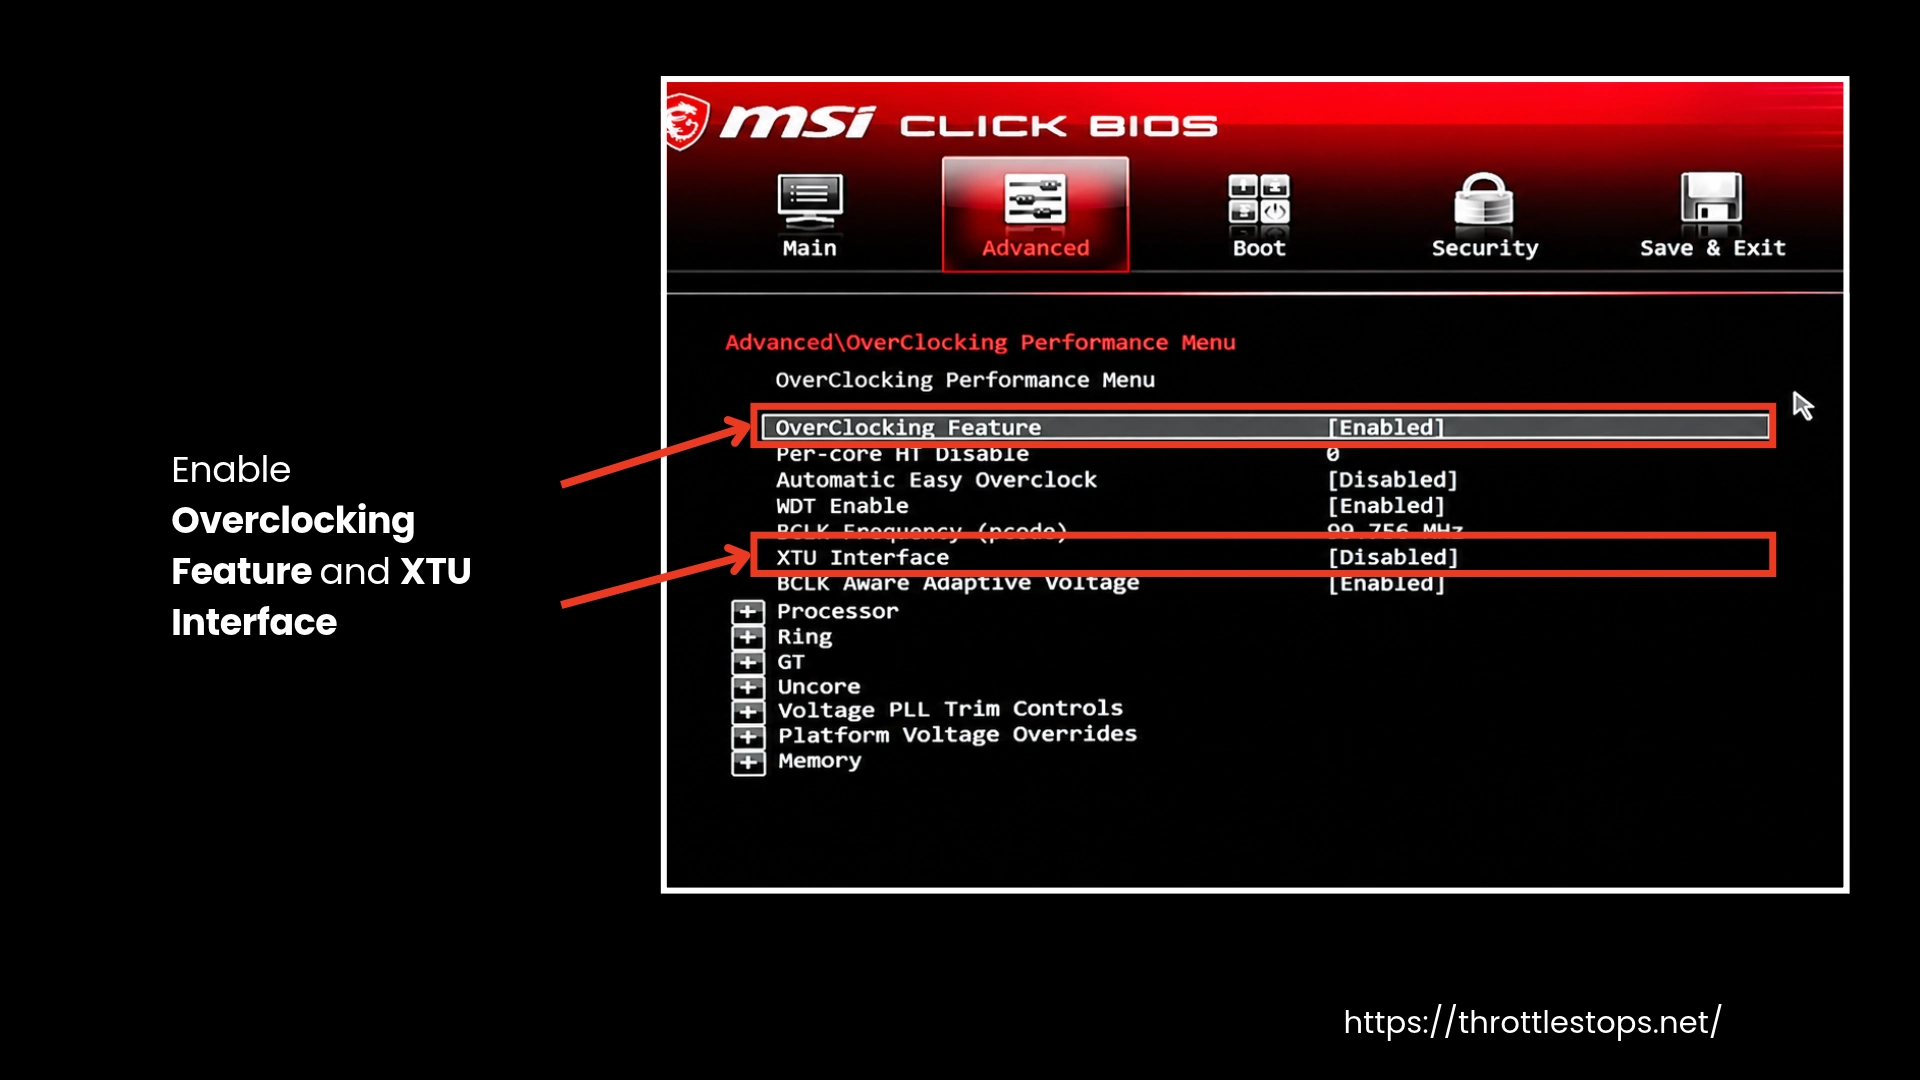
- On MSI laptops, unlock Advanced BIOS (Right Shift + Right Ctrl + Left Alt + F2), then enable Overclocking Feature and XTU Interface.
- On Dell systems, voltage control requires EFI variable edits to disable CFG Lock, which carries real risk.
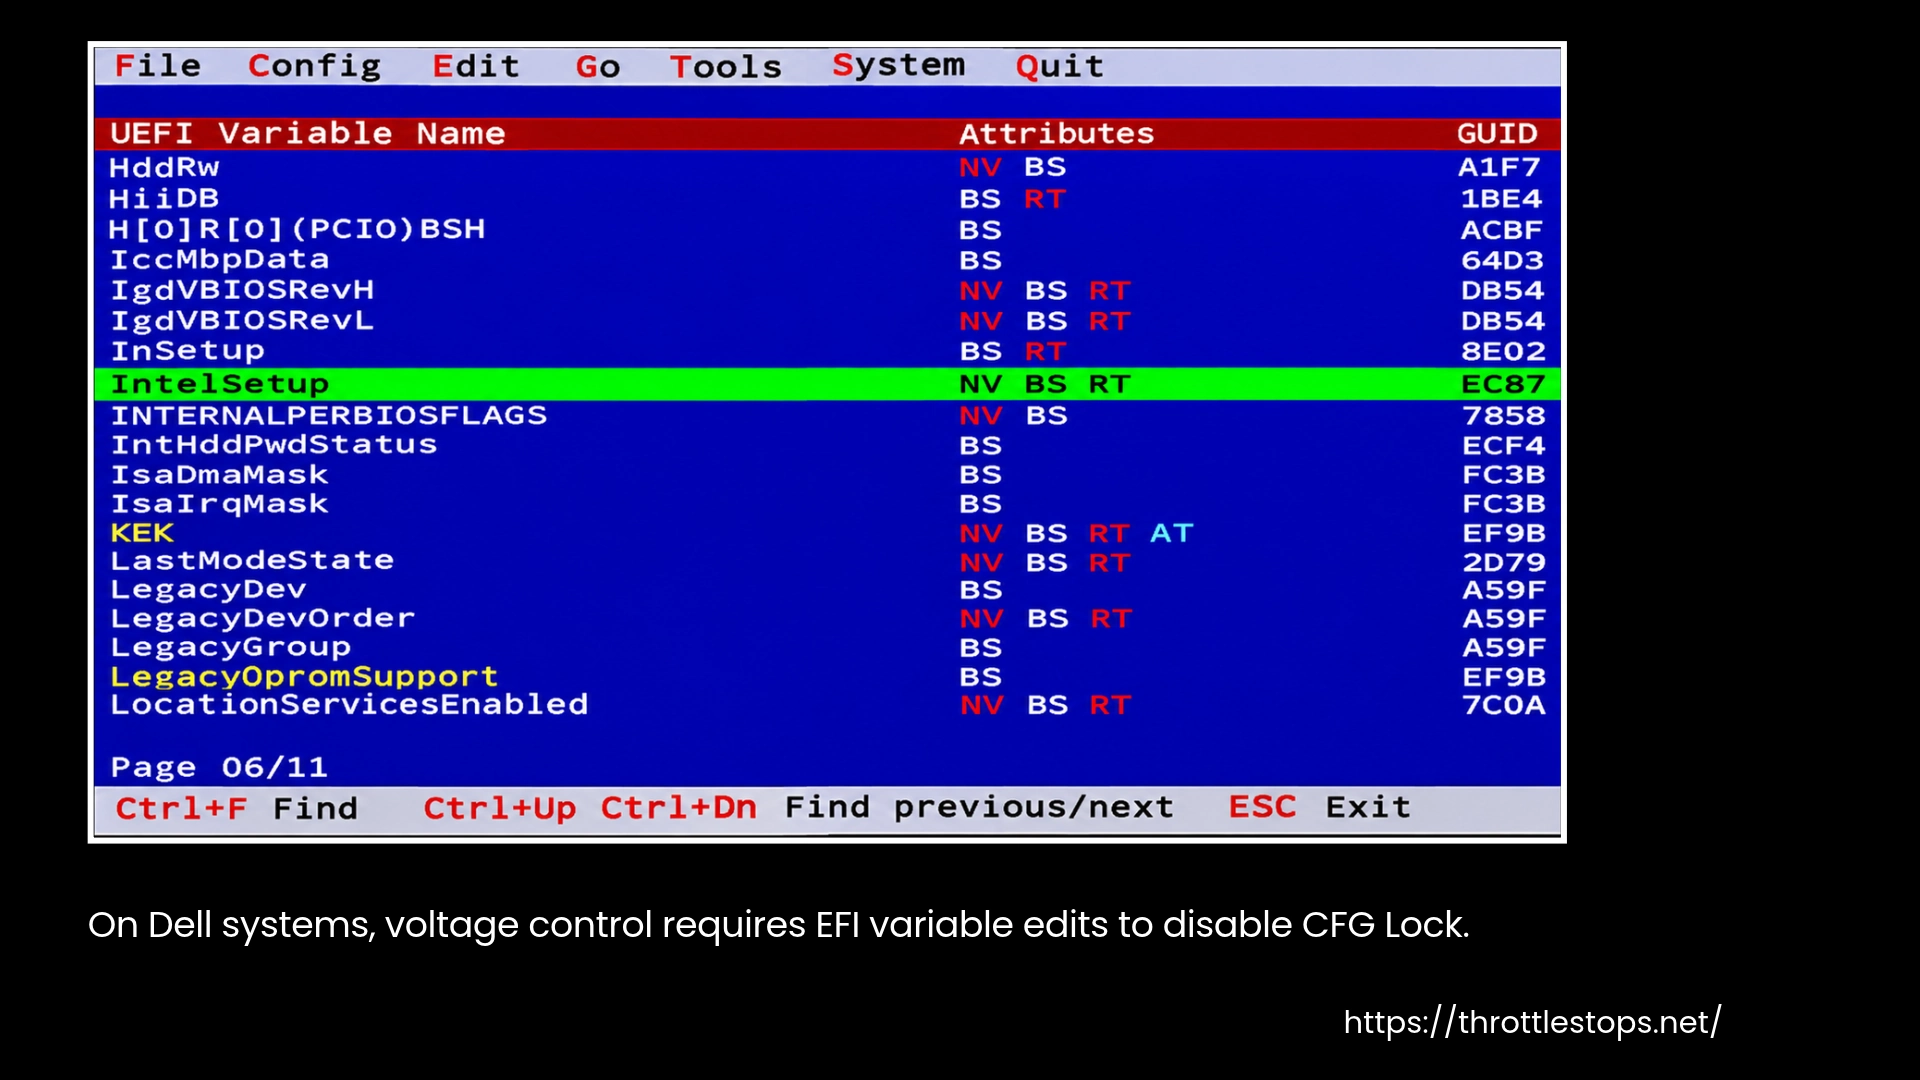
- If BIOS options do not exist, undervolting is firmware-locked and cannot be enabled safely.
- On MSI laptops, unlock Advanced BIOS (Right Shift + Right Ctrl + Left Alt + F2), then enable Overclocking Feature and XTU Interface.
It should work now, but if you still can’t unlock adjustable voltage, use ThrottleStop PL1/PL2 power limits, turbo ratio caps, or PROCHOT offset to reduce heat safely.
“CPU Not Supported” Error in ThrottleStop
“CPU Not Supported” in ThrottleStop at launch rarely means your processor is actually unsupported. In most cases, it points to system-level restrictions blocking CPU control. Common error triggers include Intel Plundervolt security changes on 11th Gen U and G series CPUs, OEM BIOS limits from Dell, MSI, or Lenovo laptops, and occasional interference from Windows 11 security features. Sometimes, it is also caused by a corrupted or missing ThrottleStop configuration file after installation.
To fix it, repeat the BIOS checks from earlier steps, try any model-specific unlock options, reset ThrottleStop by deleting the .ini file, and install the latest version.
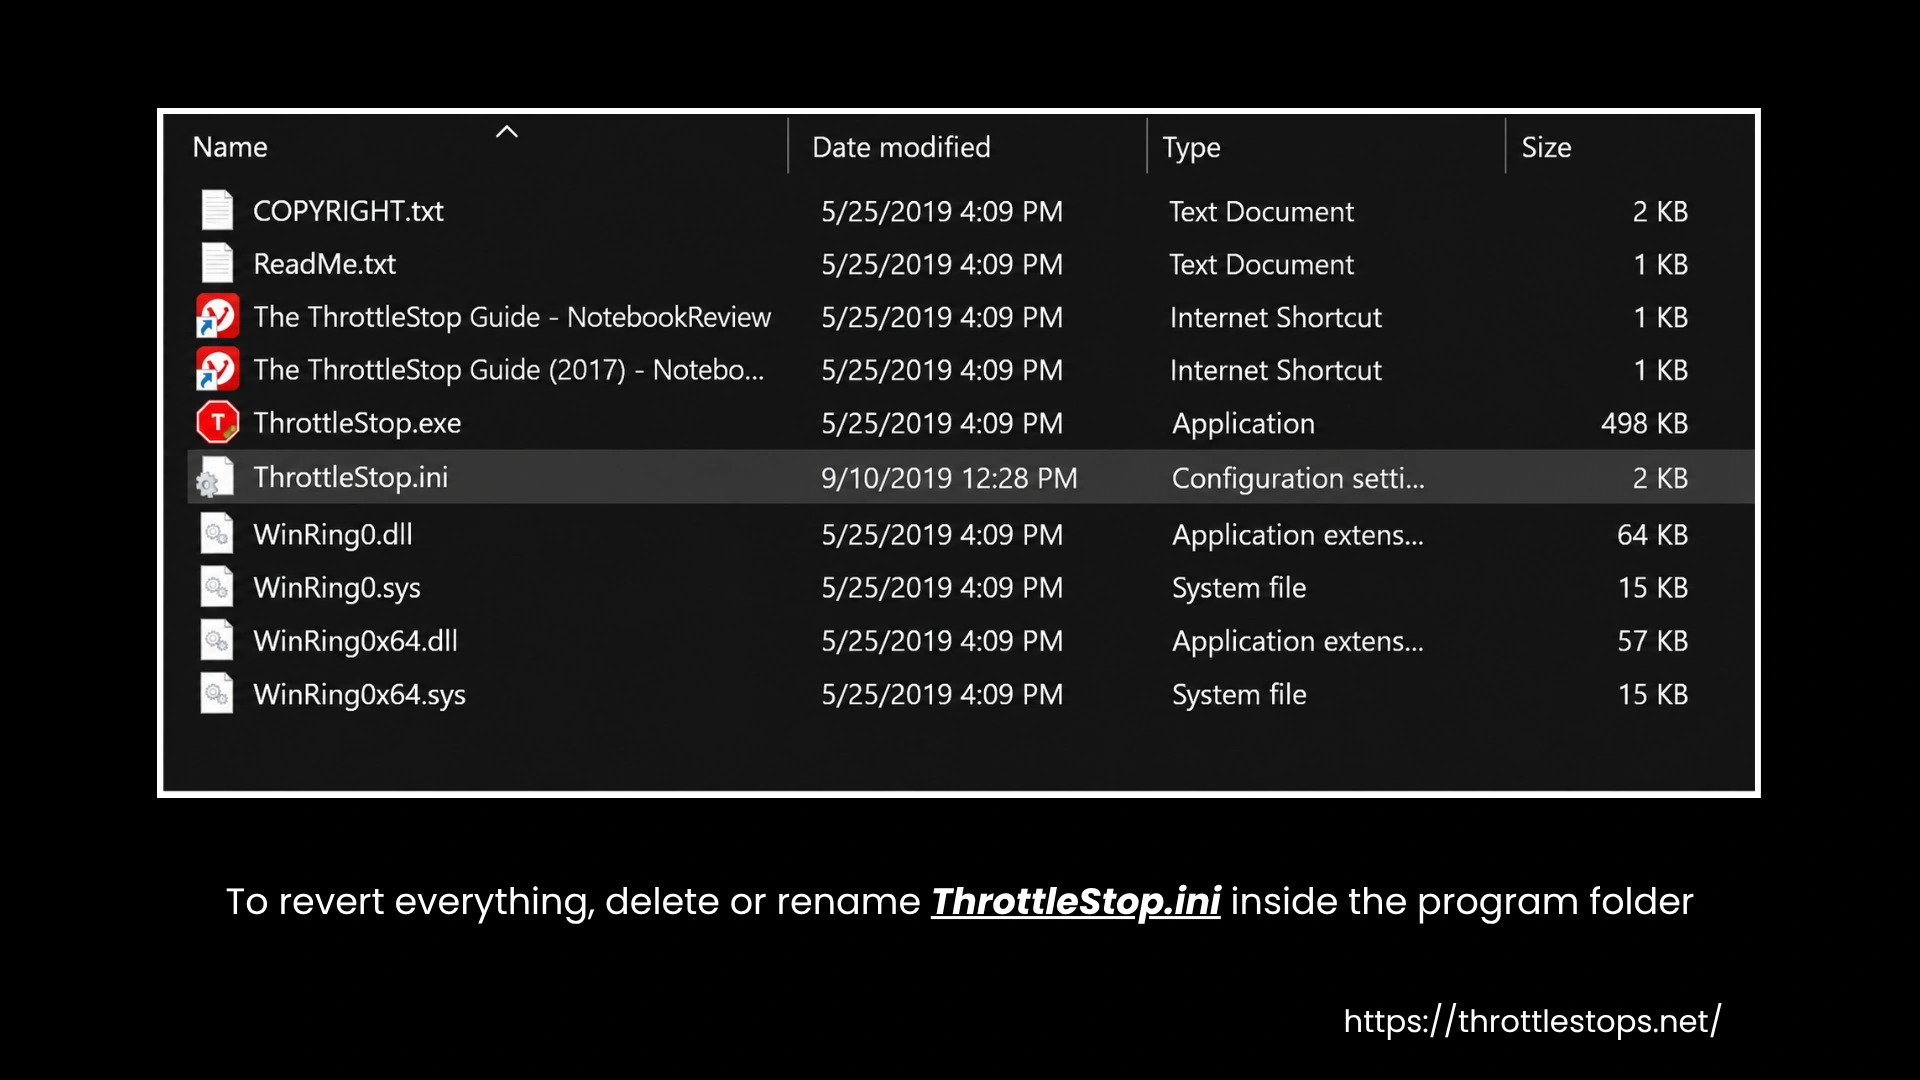
ThrottleStop Not Applying Undervolt
If, after applying a voltage offset in ThrottleStop, your temperatures and performance refuse to change, the issue isn't that you need a lower offset; it's something else canceling out the undervolt. The usual suspects are leftover Intel XTU settings, a corrupted ThrottleStop.ini file, a PROCHOT Offset set too low, or a cooling system clogged with dust.
To fix it, finish the BIOS and Windows steps from earlier guides, delete the ThrottleStop.ini file for a fresh start, apply a small negative offset in the FIVR panel, raise the PROCHOT Offset to around 3 to 5 degrees, and clean your laptop's cooling system if temperatures stay high.
ThrottleStop FIVR Issues (Locked & Not Available)
If the FIVR (Fully Integrated Voltage Regulator) window inside ThrottleStop shows Locked or Not Available, voltage control is blocked at either the firmware or CPU level. Locked usually refers to Windows 11 security features, BIOS updates, or CFG Lock turning voltage access off, which means it can often be reopened.
Not Available is more serious and usually shows up on 11th Gen G or U series Intel CPUs, newer H-series chips, or laptops with permanent manufacturer locks, where voltage control was removed entirely after Intel's Plundervolt security patch.
To fix it, turn off Memory Integrity in Windows Security, disable CFG Lock or Overclock Lock in BIOS, and check for older or modded BIOS versions for your model. When voltage control stays blocked, fall back on ThrottleStop's Turbo Power Limits and Speed Shift Max to control heat safely.
CPU Still Throttles Even with BD PROCHOT Disabled
Some Intel laptops continue to throttle despite disabling BD PROCHOT, often due to hardware or firmware constraints. Users don’t know that BD PROCHOT only blocks external throttling signals, and the CPU will still throttle if it hits thermal or power limits.
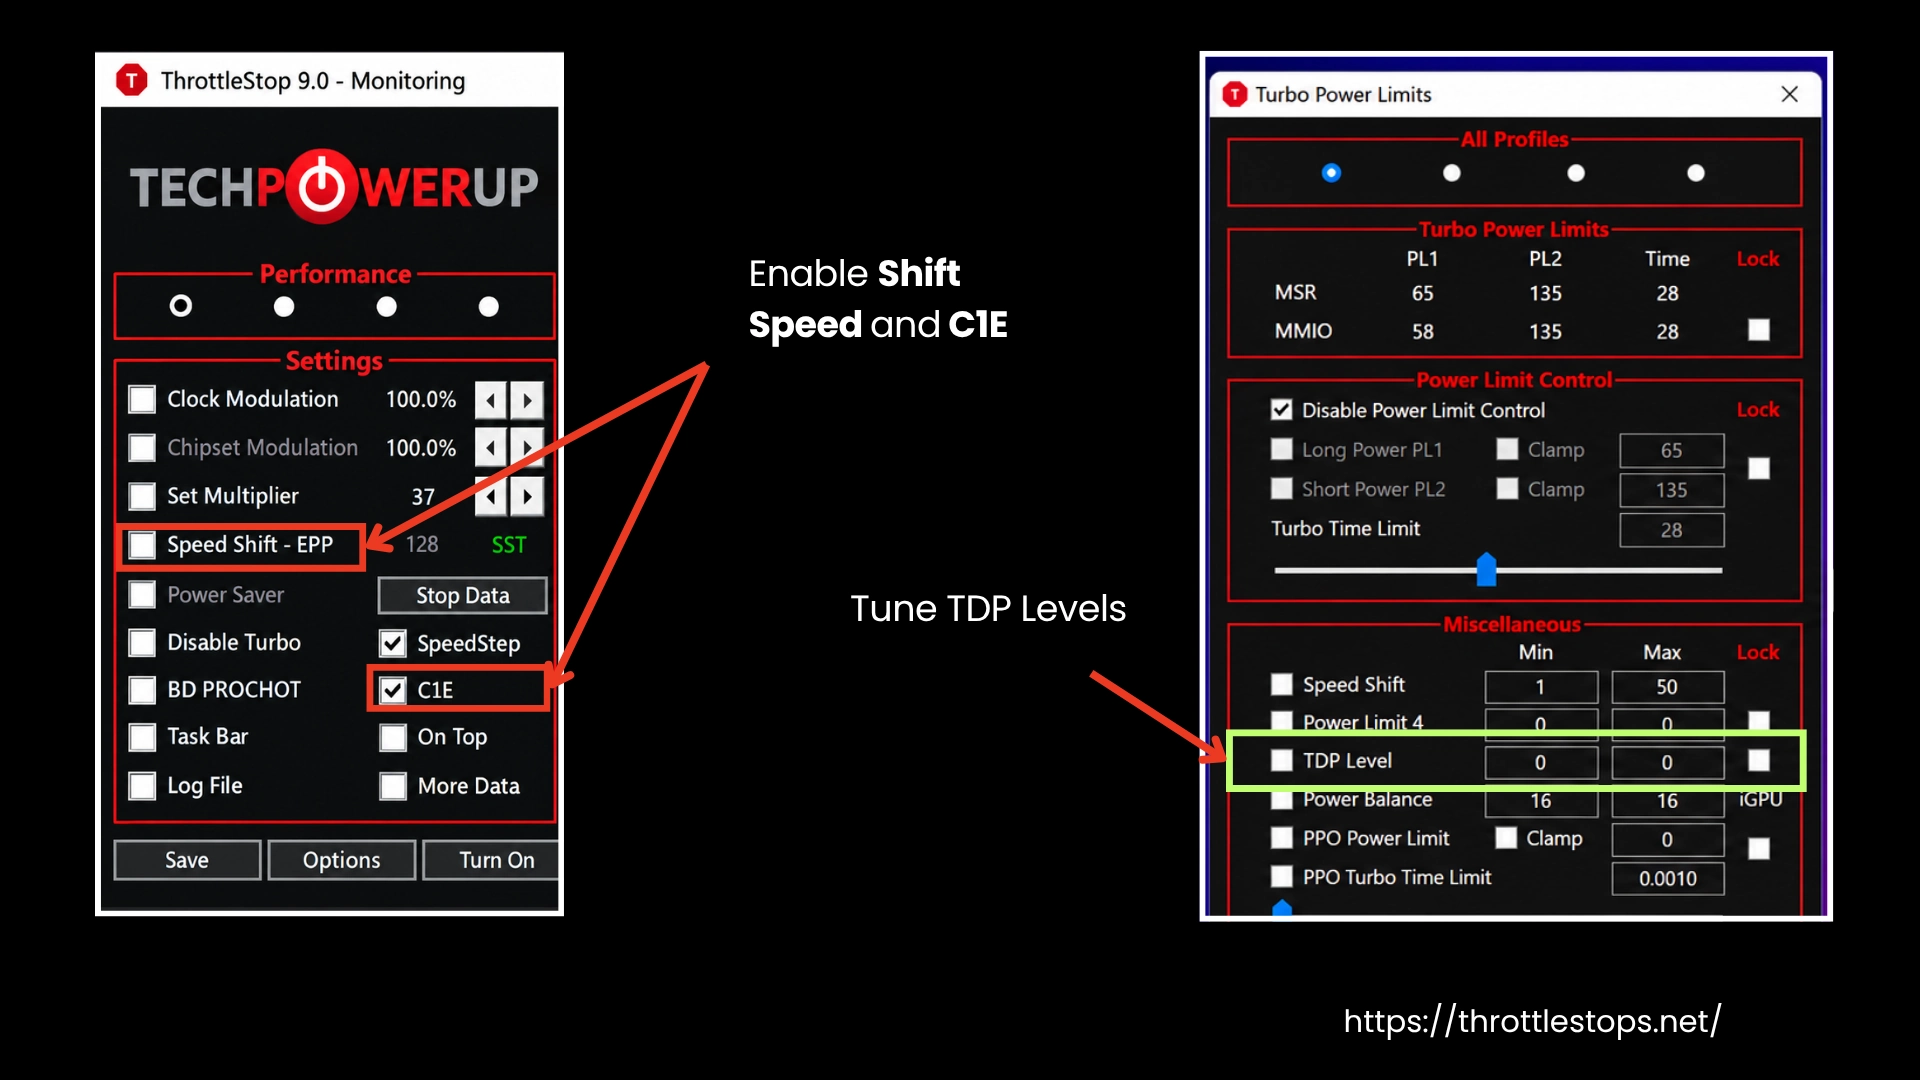
If that’s your issue, you can fix it by enabling Speed Shift and C1E, adjusting PROCHOT Offset to a safe value, applying a small undervolt in the FIVR panel, tuning TDP levels in the TPL window, and improving cooling by cleaning the fan and selecting an active power plan.
ThrottleStop BSOD and Crashes
If ThrottleStop triggers blue screens or sudden freezes during undervolting, the cause is almost always settings that the CPU cannot handle. The usual triggers are voltage offsets pushed too low, Core Multiplier or TDP raised beyond safe limits, conflicts with tools like Intel XTU, and outdated Windows builds.
To fix it, raise the undervolt offset slightly, close other monitoring software, reset ThrottleStop by deleting the .ini file, keep the Core Multiplier within safe values, and match TDP to your cooling setup. Test stability after each change.
ThrottleStop Settings Reset After Reboot
If ThrottleStop keeps resetting your settings after every reboot, it usually means Windows is blocking the program from saving changes properly. The problem often comes from missing administrator access, a damaged ThrottleStop.ini file, or antivirus software interfering with file changes in the background.
Running ThrottleStop as an administrator, fixing the INI file, and allowing the app through antivirus protection usually solves the issue quickly. Once fixed, your undervolt and power settings should stay applied normally after every restart.
CPU Not Reaching Full Speed / Speed Shift Not Detected
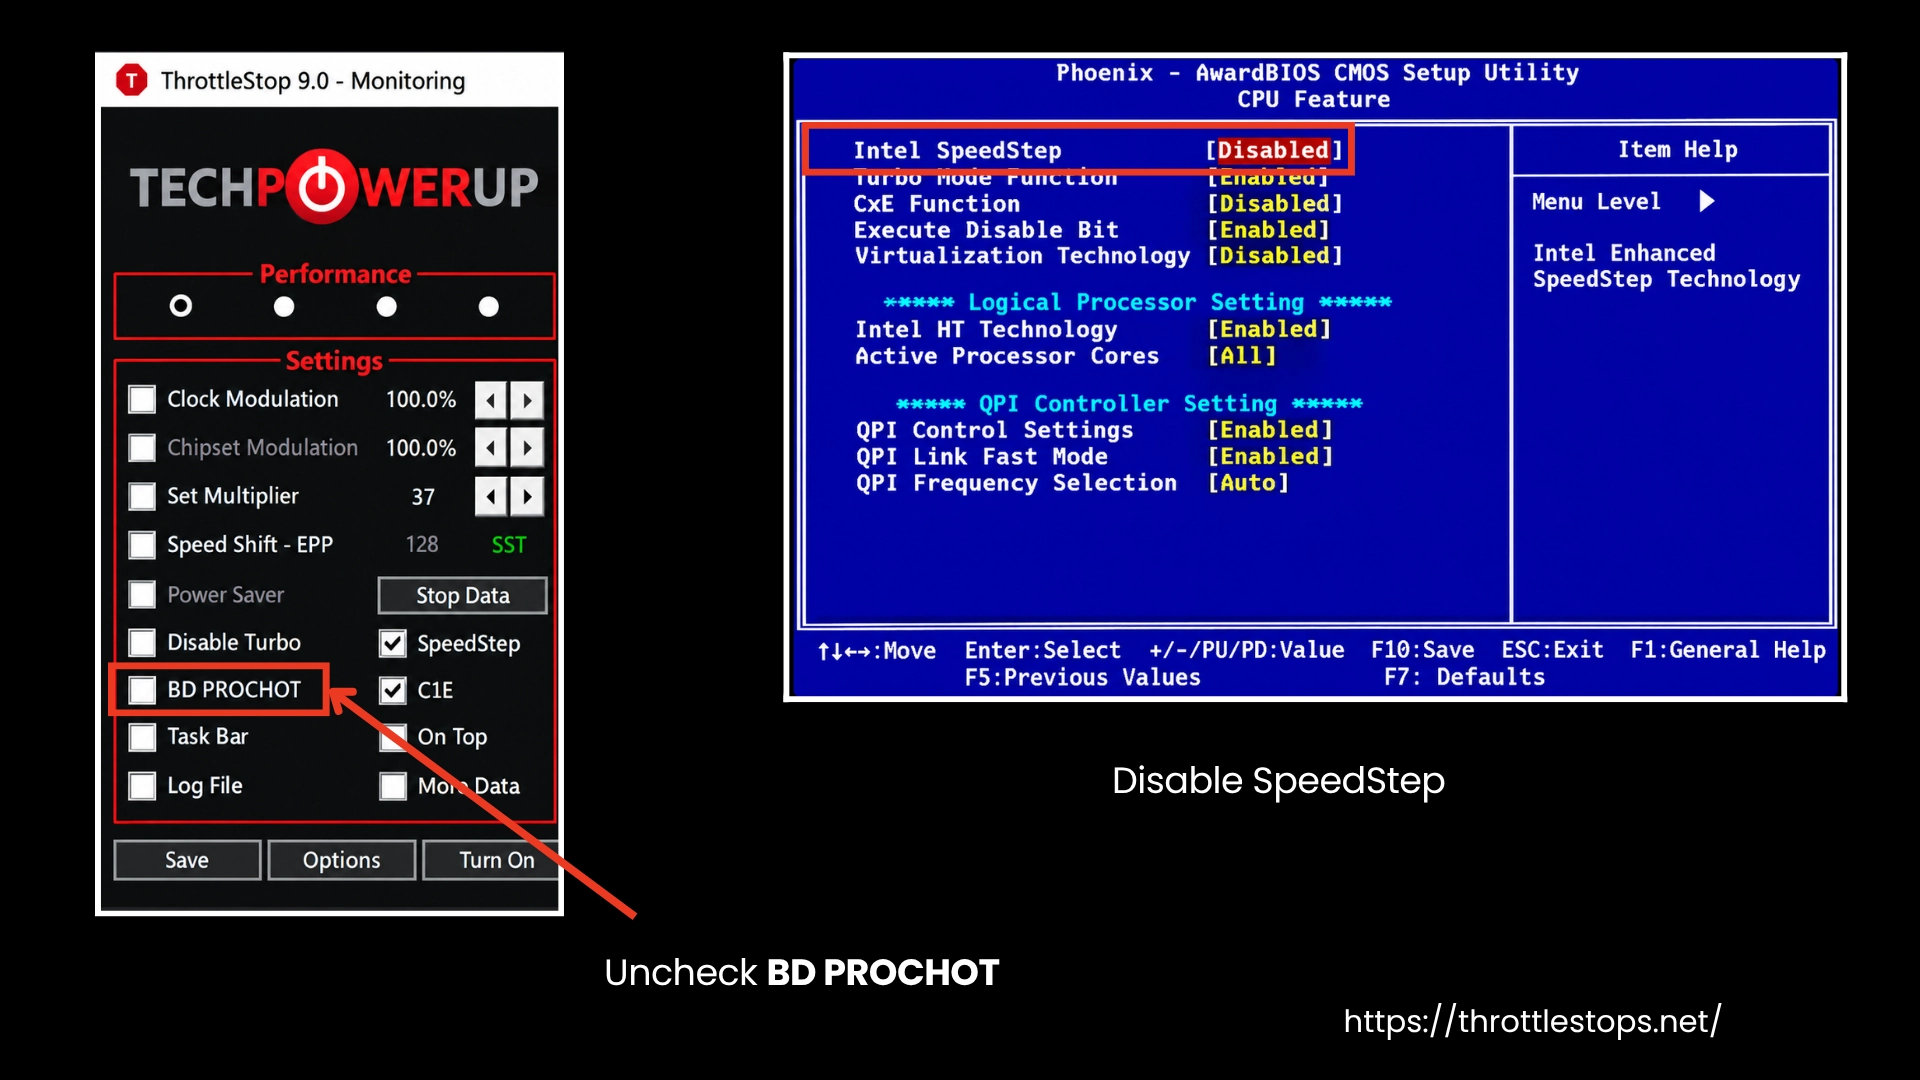
When the MHz value in ThrottleStop stays far below the CPU's normal boost speed, something is holding the processor back. The cause is often Speed Shift not getting detected, which only works on Intel 6th Gen and newer CPUs (AMD users should try Ryzen Master or Ryzen Controller instead). On supported CPUs, the usual culprits are BIOS power-saving settings, BD PROCHOT throttling, or high CPU temperatures.
To fix it, update ThrottleStop, uncheck BD PROCHOT, disable SpeedStep and power-saving features in BIOS, and clean your cooling system.
ThrottleStop Not Starting on Windows Boot
ThrottleStop not starting on Windows boot usually means Windows is blocking the app from launching in the background. Missing startup shortcuts, User Account Control restrictions, or broken Task Scheduler settings are the most common causes. Adding ThrottleStop to the Startup folder and running it with administrator privileges normally fixes the problem quickly. Antivirus software can also stop it silently after updates.
If the app keeps resetting after restart or never opens automatically, follow our full ThrottleStop Not Starting on Windows Boot guide for the exact setup process.
ThrottleStop Showing 0 Cores
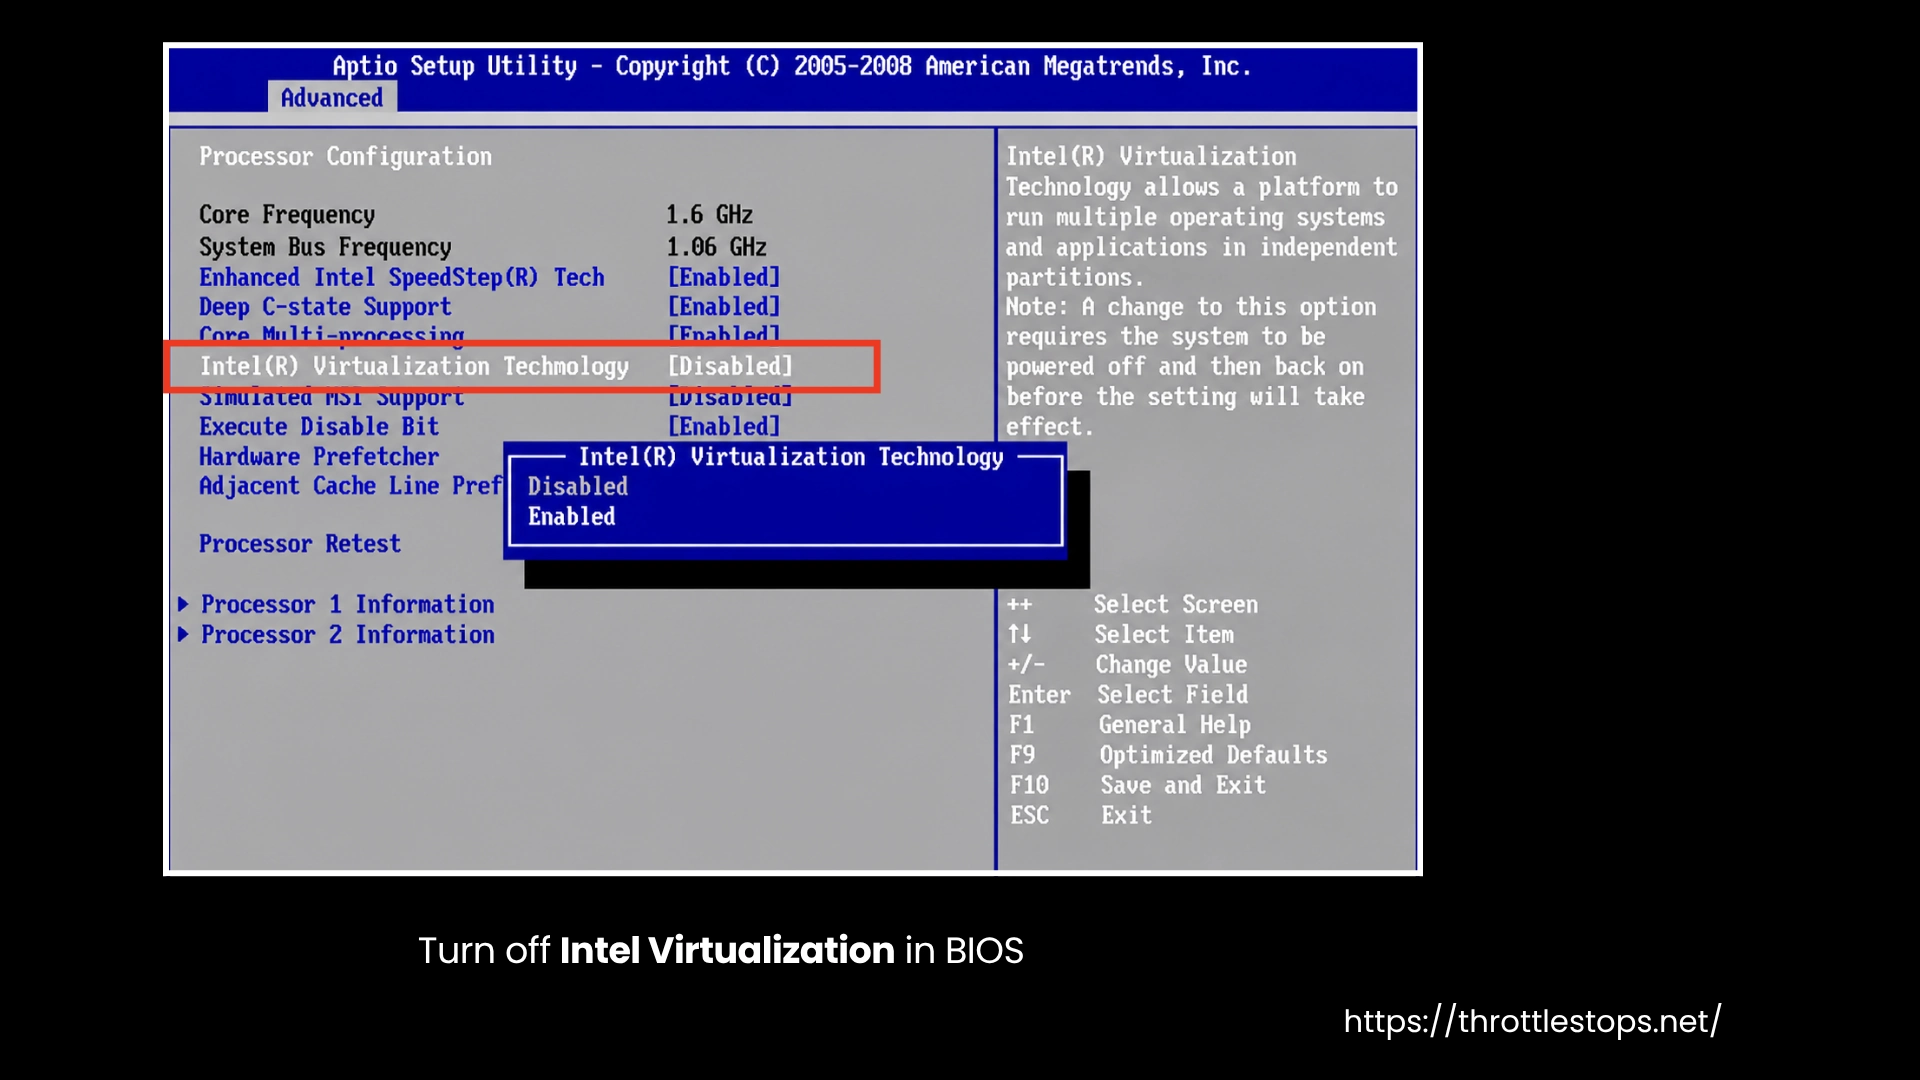
When ThrottleStop shows zero cores after you open it, this does not mean anything is wrong with your processor hardware-wise. This can result from a BIOS feature that conflicts with how ThrottleStop works, a settings file that has become corrupted, or pre-installed laptop software running power limits in the background.
To fix this, turn off Intel Virtualization in BIOS, perform a Shift + Shutdown, delete the ThrottleStop.ini file, and remove any tuning software like MSI Center or Armoury Crate. These steps may help restore proper CPU core detection inside ThrottleStop. For the full walkthrough, read the guide on how to fix ThrottleStop showing 0 cores on your laptop.
Conclusion
Overall, ThrottleStop not working is mostly due to BIOS locks, CPU restrictions, or Windows 11 security features. This guide works best on older Intel laptops, where ThrottleStop can safely apply CPU undervolting and disable Turbo Boost to reduce temperatures, improve battery life, and extend hardware longevity. Keep in mind that aggressive undervolting can trigger crashes, so gradual adjustments are key. For step-by-step guidance, check out our ThrottleStop guide to optimize your system without risking stability or hardware damage.